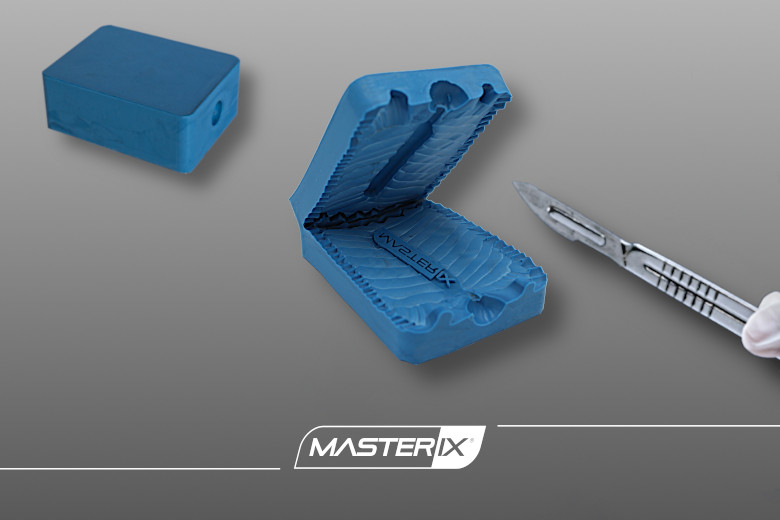
Mold cutting is one of the very first steps in the lost wax casting process, but also one of the most important for the quality of the finished products. If the rubber is badly cut, the injection will not be accurate and the wax model will not have the exact shape of the metal master to be reproduced. As a result, the jewel may have defects in shape or surface.
Even before cutting the mold, however, there is another crucial stage for a perfect production: the creation of a state-of-the-art rubber mold. An essential requirement is a high-standard vulcanizer that eliminates moisture and micro-bubbles from the silicone.
From the mold to the jewel: all the stages
Let us briefly go through all the stages of the lost-wax casting process, with a focus on mold cutting.
Mold vulcanization
The two processes of hot and cold vulcanization are very different, let's see them in detail.
Hot vulcanization is carried out using:
- Vulcanizer
- Vulcanizable silicone
- Metal brackets
- Model (master) in metal or vulcanizable resin.
Cold vulcanization, on the other hand, involves the use of:
- Vacuum bell
- Two-component liquid silicone
- Brackets for liquid silicone
- Model (master) in metal, resin and wax.
Compared to cold vulcanization, the use of hot vulcanization makes it possible to produce rubber molds that perform better and are more durable. As a result, the rubbers will be free of micro-bubbles and traces of moisture, will remain durable and resistant over time even after many uses, and will retain the right degree of elasticity.
Mold cutting
Once the rubber mold has been vulcanized with the metal master inside, we move on to mold cutting. The aim of this step is to remove the part inside and prepare the mold for injection.
Always bear in mind that the quality of the cut is crucial for the next steps. The model must be removed with the utmost care to maintain its exact shape. We use a scalpel to work with the utmost precision and achieve a clean cut.
The first thing to do is to trace a zigzag “path” on the sides of the rubber mold. This will be the line to be followed with the scalpel. It is very important that the cut is not regular, but full of angles and recesses. In this way, the two parts of the mold will close perfectly and hold their position without slipping during injection. The wax will fill all the cavities without any risk of spilling.
At the beginning of the process, we incise the mold following the previously traced line only on the outer part of the rubber, without going too deep.
Once we have begun to cut, we secure the rubber in the rubber opener, a machine that we have internally designed in Masterix to facilitate all these operations. The mold is clamped on all four sides of the front part, on the side where the wax will be injected.
The advantages of using this machine are essentially twofold:
- The mold remains secured and does not "yield" to stress from the cut, ensuring maximum precision
- The mould can be rotated as required, ensuring maximum maneuverability, visibility of the working area and operator comfort.
At this point, we deepen the incision in the rubber, step by step and with the utmost care. We must reach the "heart" of the mold to remove the metal model, always following its shape and without risking damaging it with the scalpel blade.
We collect the master and continue to open the mold until only a few centimeters are left on the backside. The mold should not be split in half but should remain attached at the rear to facilitate wax injection and ensure a perfect closure.
Once the mold is ready, we remove it from the rubber opener, and we are ready to start with the wax injection.
Wax injection, cooling, and mold opening
The injectors create a vacuum in the mold and fill it with molten wax. The rubber molds filled with wax are moved to the coolers. Once the shape has solidified, the molds are opened, and the wax models are extracted.
From tree to semi-finished product
The wax models are attached to a wax tree, which is immersed in a plaster solution. The plaster forms a shell around the tree, which is then put in an oven, and the melted wax flows out.
The molten metal is poured into the plaster shell, filling all the cavities left by the melted wax. The plaster is opened, the forms are collected, and they undergo further mechanical processing or surface finishing.
How important is the cutting of the molds for a high-quality finished product?
In the lost-wax casting process, machinery plays a crucial role. Injectors, coolers, pumps, and vulcanizers must be state-of-the-art to ensure quality results and optimize production costs.
However, the skills of the operator are also extremely important, especially in a delicate procedure such as mold cutting. The success of the entire process depends on the quality of the rubber mold. That is why tyre cutting is a crucial step, to which we at Masterix devote the utmost attention.


